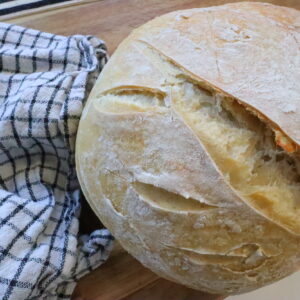
Easy Sourdough Bread
A no fuss technique to getting sourdough bread on the table
Equipment
- Large Glass Bowl
- Banneton proofing basket (optional)
- Dutch Oven
- Parchment paper
- Kitchenaid mixer with dough hook attachment (optional)
- Wooden spoon for mixing if you are doing it by hand
- Dough scraper for working with the bread dough
Ingredients
- 2 Cups Mature Sourdough Starter
- 5 Cups Flour
- 1-2 Cups Water Add 2 cups if the dough isn't sticky
- 2 Tbsp Sea Salt
Instructions
- First thing is to feed your sough dough starter 5-12 hours before even making this bread. As I mentioned above having a bubbly and ready to go starter is key for success!
- Combine both your warm water and your regular flour to a bowl and let the water hydrate the flour. You can leave it for 15-20 minutes before adding in your sourdough starter.
- After you add in your active sourdough starter sprinkle salt on top and incorporate together with your hands, a mixer, or even wooden spoon.
- Once the dough ball is formed cover your bowl with a damp tea towel and let it rest for around 30 minutes to an hour in a warm place preferably over 70 degrees Fahrenheit.
Stretch and Fold
- Once your sourdough has rested in a warm place for around 30 minutes now is the time to stretch the dough and fold it overtop of itself. This process establishes the gluten and will ensure you have a nice rise when it comes time to bake!
- Work in sets of three. Do your first 3 stretch and folds every 15-30 minutes for about an hour and then let it rest again in a warm place covered by a damp towel or plastic wrap. You will want to see the dough doubled in size.
- You can let your dough sit all day long if you need it to, or revisit it after a few hours. I will cover bowl and let it go for about 6 hours.
Proofing and Prepping To Bake
- Once your dough has doubled in size it is time to get it out of the mixer bowl and shape it into a nice round ball. I love to use my dough scraper for this in case I need to split my dough in two or just work it around.
- I flour a work surface and get the dough to form its desired shape. I will emphasize having a floured work space is nice in case you have sticky dough, that way it doesn't ruin any of those precious bubbles you worked hard for!Next, if you are using a Banneton basket, transfer the dough into the basket and cover it. Place it in the fridge for at least 12 hours to proof. I like to do this overnight.
- The next day your bread is about ready to bake. Preheat your oven to 500 degrees with your dutch oven inside of it.If you want to make pretty designs on the top of the dough, now is the time! I use a razor blade which does the trick really well! I prefer a razor over a sharp knife because it won't damage the dough. Transfer your bread from the basket to your parchment paper and then place it in the hot dutch oven.Bake for 20 minutes covered at 500 degrees, and then take your lid off and reduce the heat to 475 and bake for another 30 minutes or until the crust is brown.